
Generate Quiz from PDF Files Online & Free with uPresenter
Creating quizzes from existing content can be time-consuming, but with uPresenter, you can effortlessly generate quiz with AI from PDF files. Whether you’re an educator, trainer, or content creator, this free online quiz generator helps streamline your workflow and enhance engagement.
Let’s explore how you can convert your PDF documents into interactive quizzes in just a few simple steps.
Why Use uPresenter to Generate Quiz with AI?
uPresenter leverages advanced AI technology to automatically extract key information from your PDFs and turn them into well-structured quiz questions. Here’s why it stands out:
- AI-Powered question generation : Just enter your prompt, or upload files such as MS Word, PDF or PowerPoint, you can get a quiz in seconds.
- Multiple question types: uPresenter supports up to 11 different question types including multiple-choice, true/false, matching, labeling, hotspot, and more.
- Free & online: A truly free AI tool for quiz, accessible from any device without installation.
Step-by-Step Guide: How to Generate Quiz from PDF with uPresenter
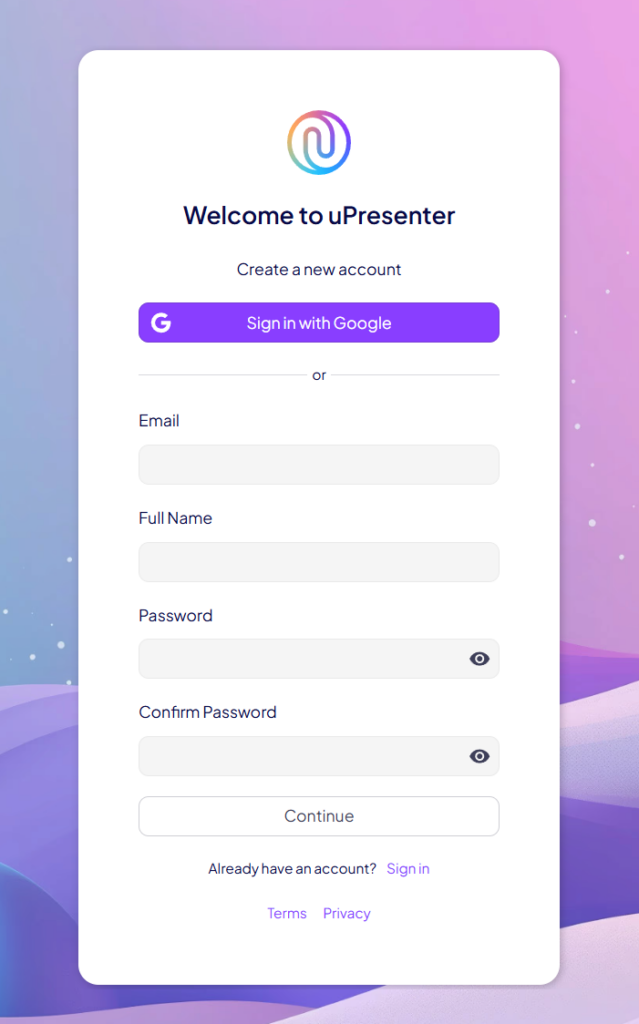
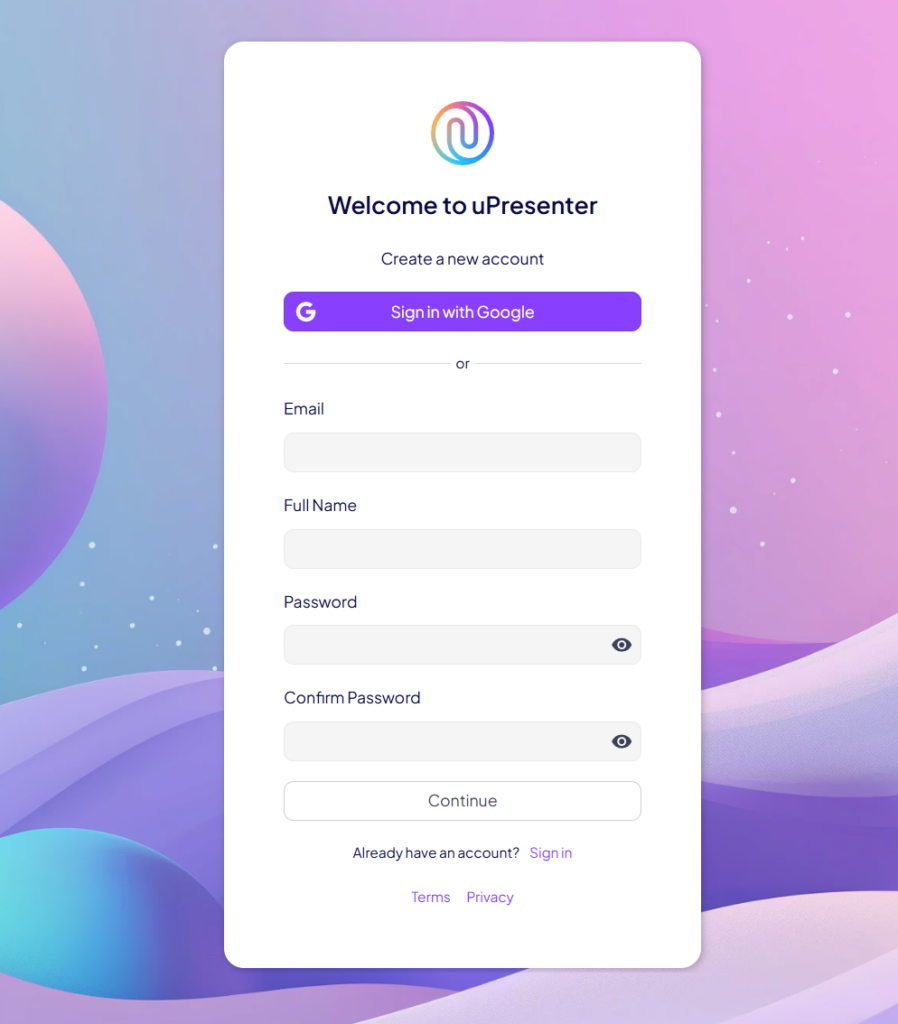
Step 1: Sign up for an uPresenter account
Visit the website uPresenter – Interactive Platform for eLearning Content Creation then simply sign up for a free account with your Google account. It only takes a minute, and you’ll be able to access all of their features.
Step 2: Upload your PDF file
Once you’ve signed up, click on Import Document in the homepage to start building a quiz with your PDF file.

uPresenter supports importing documents in various formats, including PDF, PowerPoint, Word, Excel and text files.
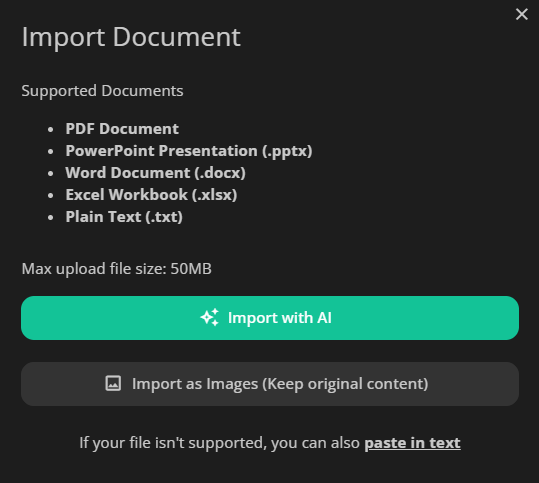
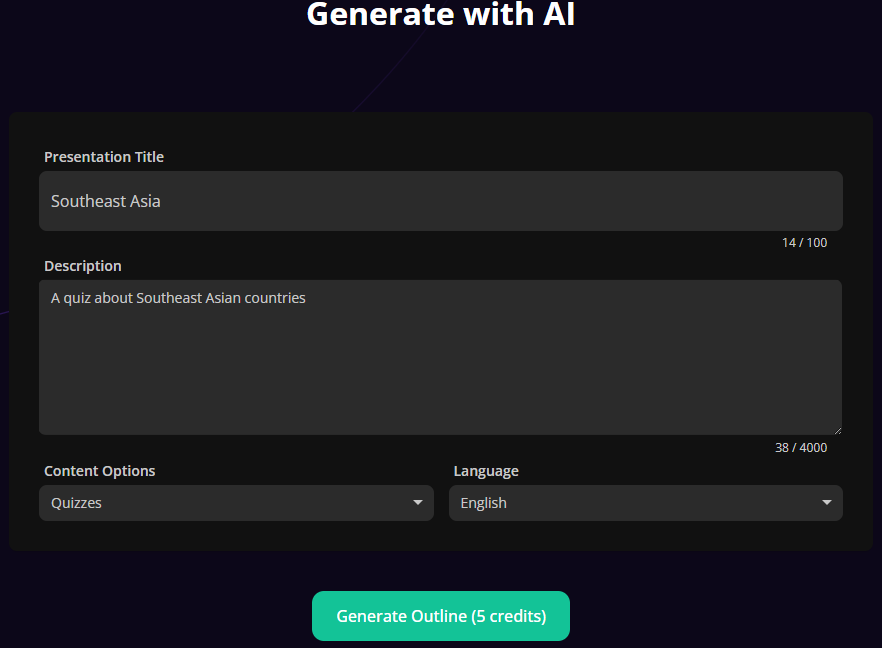
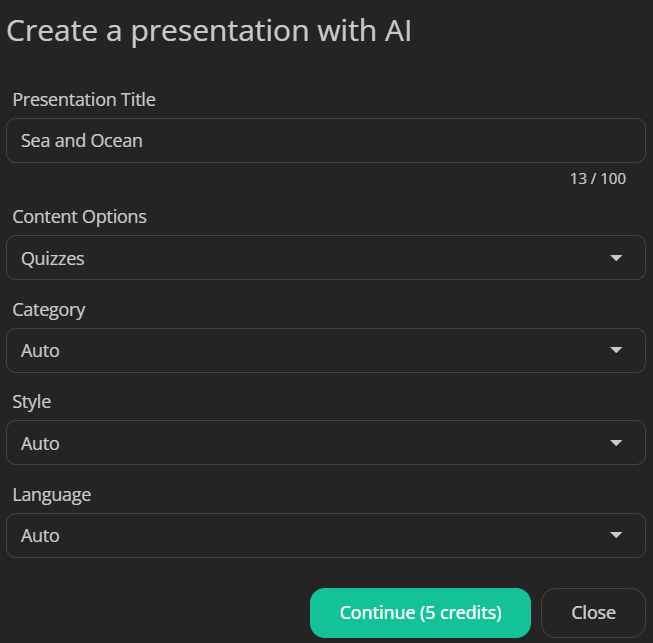
Click on the Import with AI button, and choose a PDF file from your computer. In the Content Options section, let’s select Quizzes if you wanna create only quizzes based on the content of the imported file.
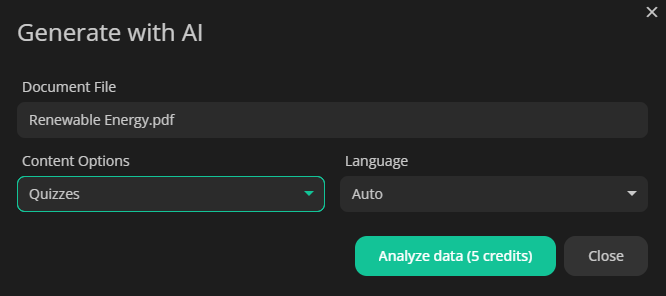
Step 3: Let AI process your content
Then uPresenter will analyze your document and automatically extracts key information to create relevant quiz questions with a chosen theme.
Wait a minute and your quiz is ready to use.
Step 4: Customize your quiz
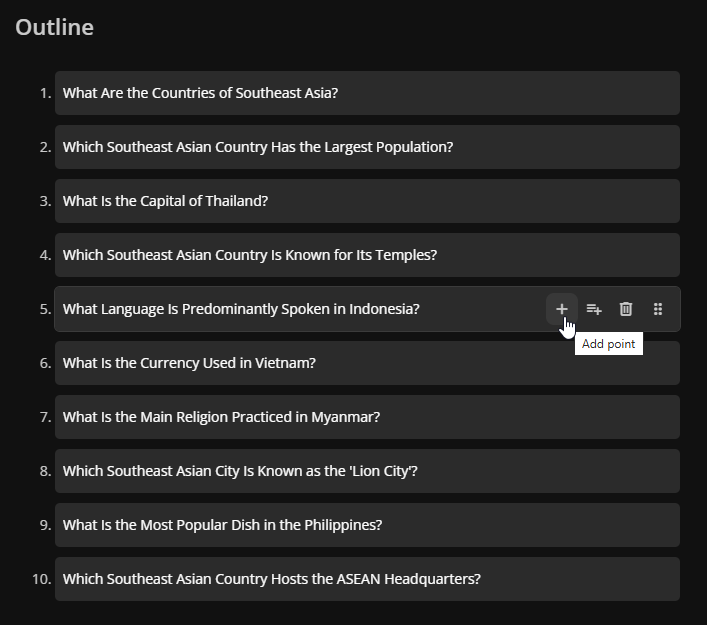
Once the questions are generated, you can customize them as you want. For example:
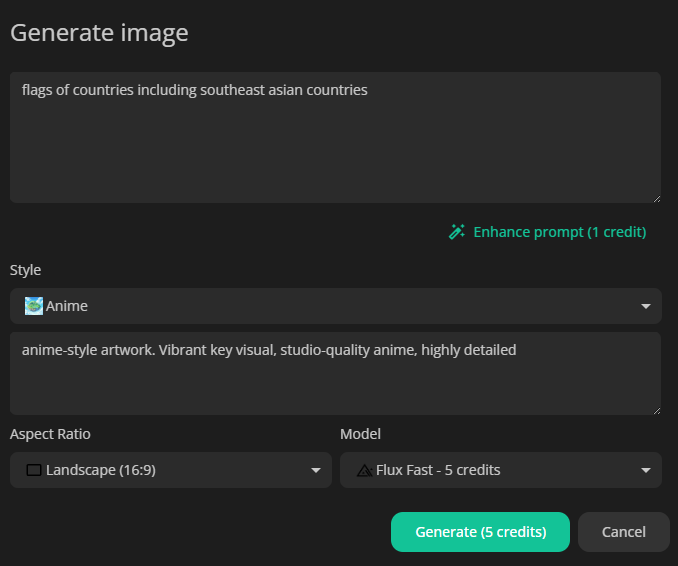
- For image-based questions such as Hotspot or Labeling, you can generate AI images by entering prompts.
- Add and edit text.
- Add multimedia such as text to speech audio, videos, images.
- Create new questions manually.
- Adjust the score of each question.
- Enable instant feedback for learners.
- Set the scores of total questions as the conditions for learners to pass or fail the quiz.
Step 5: Publish & share
Once you’re satisfied, just publish the quiz. Then share the quiz link with your students, team, or audience – all in just minutes.
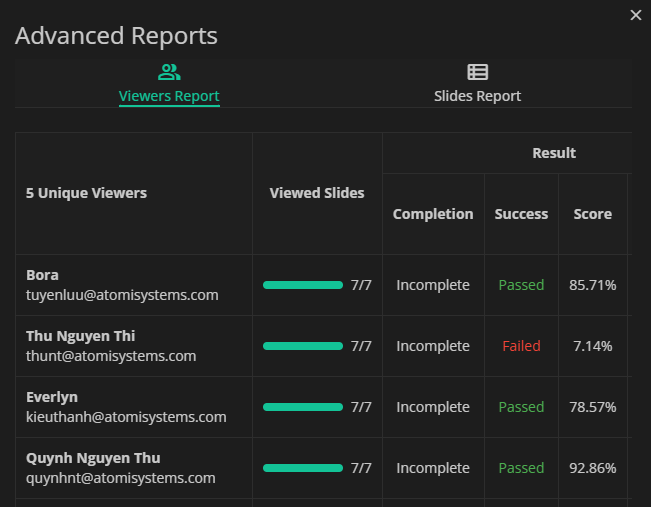
Want to track performance? Check the Report button at the top right corner to see the completion and success status, scores, and question-wise analytics.
Try uPresenter’s AI Quiz Generator Today!
With uPresenter, you can generate quiz with AI quickly and efficiently. Whether you need a free online quiz generator for teaching, training, or self-study, this tool makes the process seamless. Try it now and transform your PDFs into interactive quizzes in seconds!
Read more:
- Interactive Learning: Exploring Common Question Types in eLearning
- How to Create Interactive Quizzes in uPresenter – A Complete Guide for Beginners – uLearnBox
- Best Free AI-Powered eLearning Quiz Generator 2025 – uPresenter Guide for Beginners
Interactive Learning: Exploring Common Question Types in eLearning
Interactive learning thrives on engagement, and questions are key. In eLearning, they’re more than just tests; they drive learning. By exploring common question types in eLearning, we can turn passive learning into active participation, boosting understanding. This blog will break down these question formats and show how they improve course design and learner retention.
Questions are vital in eLearning because they help learners connect with the material. They encourage reflection, analysis, and application, providing feedback and highlighting areas for improvement. Beyond simple recall, they promote critical thinking and problem-solving. Essentially, questions transform eLearning into a dynamic and effective learning experience.
To fully leverage these diverse question types, consider uPresenter. This AI-powered eLearning content creation tool supports nearly all common question formats, including a robust selection of 11 interactive options:
- True/False Questions
- Multiple Choice Questions
- Multiple Response Questions
- Fill in Text Entry Questions
- Sequence Questions
- Essay Questions
- Dropdown Questions
- Slider Questions
- Matching Questions
- Hotspot Questions
- Label Questions
Now, let’s discover each question type one by one and see how they can elevate your eLearning content and deliver learning outcomes.
#1. True/False Questions
A True/False question is one of the most common question types in eLearning. It provides learners a statement with two answer options are True and False, or variations like Yes/No, Correct/Incorrect. Learners select between two options to determine whether the given statement is correct or incorrect. This format is simple and widely used in quizzes, exams, and surveys to quickly assess knowledge, comprehension, or opinions.
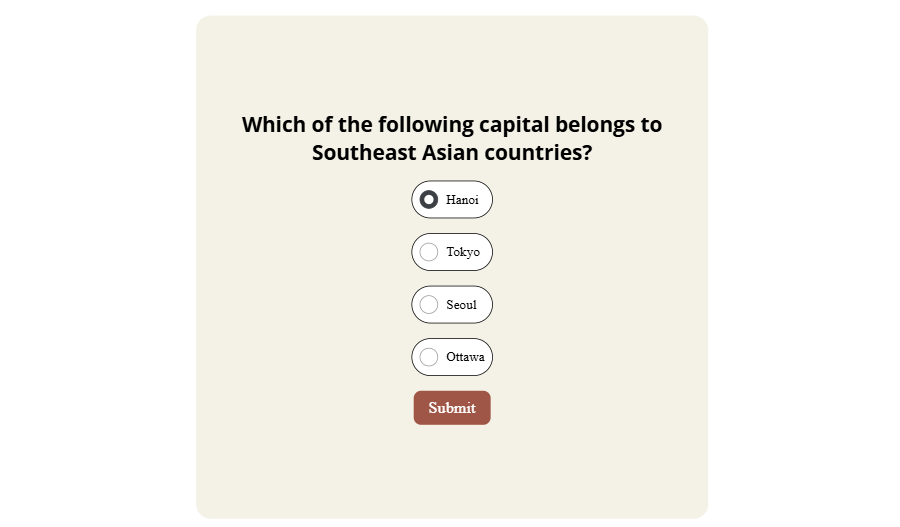
#2. Multiple Choice Questions
Another most common question type used in eLearning is Multiple Choice. These questions typically present four answer options. Usually, two of the options are completely incorrect, while the other two may seem similar, but only one is correct. The incorrect but similar option serves to distract and challenge the learner. Multiple Choice questions are effective for assessing understanding of specific topics that have clear, factual answers.
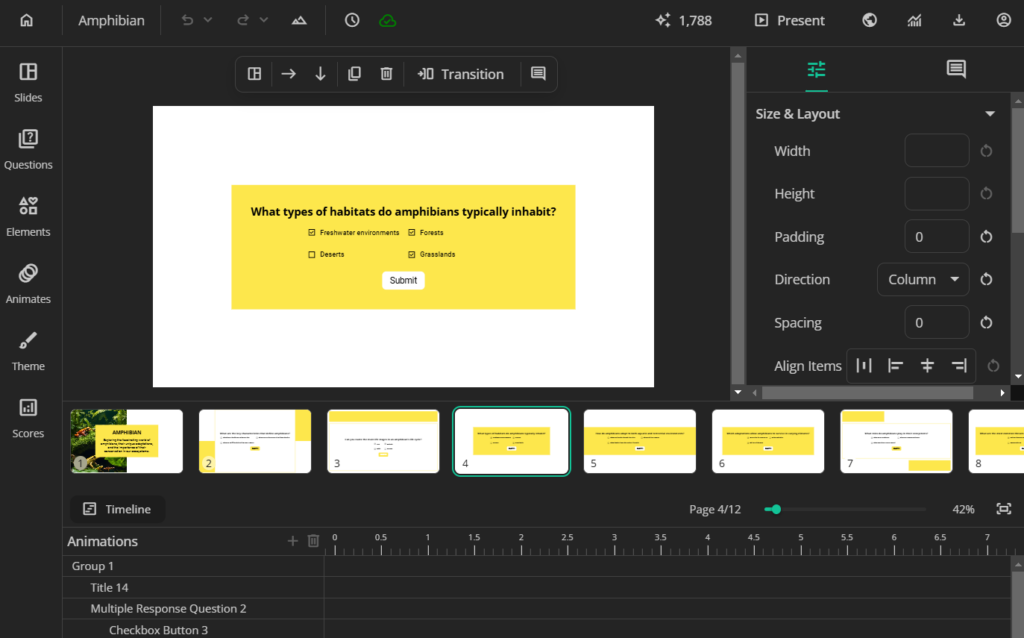
#3. Multiple Response Questions
A Multiple Response question is similar to a Multiple Choice question, as it also presents a list of answer options for learners to choose from. However, instead of having four answer options with only one correct answer, Multiple Response questions typically offer more answer options, with multiple correct answers. This format is especially useful when a question has more than one valid response, promoting deeper understanding and critical thinking.
#4. Short Answer Questions (Fill in Text Entry Questions)
A Short Answer question (previously known as a Fill in Text Entry question) often presents a sentence, or paragraph with missing words or phrases. Then, the task of learners is to type the correct answer directly into the blank space. Unlike multiple-choice, there are no answer options provided. Learners must recall and provide the answer from memory. This question is useful to test the learner’s recall, comprehension, and understanding of specific information.
#5. Sequence Questions
A Sequence question presents learners with a list of shuffled items and asks them to arrange these items in the correct order based on a specific criterion, such as chronological events, procedural steps, stages of a process, or logical sequences. Typically, learners use a drag-and-drop action to reorder the items. This question type helps assess a learner’s understanding of order, process, and logical flow.
Example applications:
- Chronology: Arrange the historical events of the French Revolution in the correct order.
- Process understanding: Order the stages of the water cycle correctly — evaporation, condensation, precipitation, and collection.
- Logical progression: Organize the steps for baking a cake from start to finish.

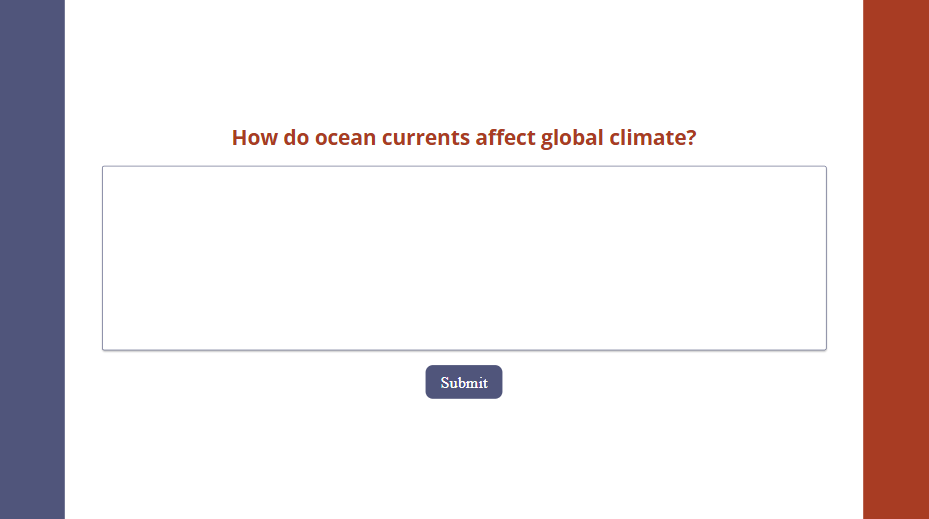
#6. Essay Questions
An Essay question is also one of common question types in eLearning. It is an open-ended question that allows users to express their ideas freely and provide in-depth responses. It doesn’t provide a list of options to select from like Multiple Choice or Multiple Response questions. The Essay question encourages critical thinking, creativity, and the ability to organize and articulate thoughts coherently. It’s commonly used in assessments to evaluate comprehension, analytical skills, and the ability to form arguments or present perspectives on complex topics. This question often requires the responder to draw from personal experiences, apply theoretical knowledge, or conduct research to support their answers, making them a valuable tool for deeper understanding and evaluation.
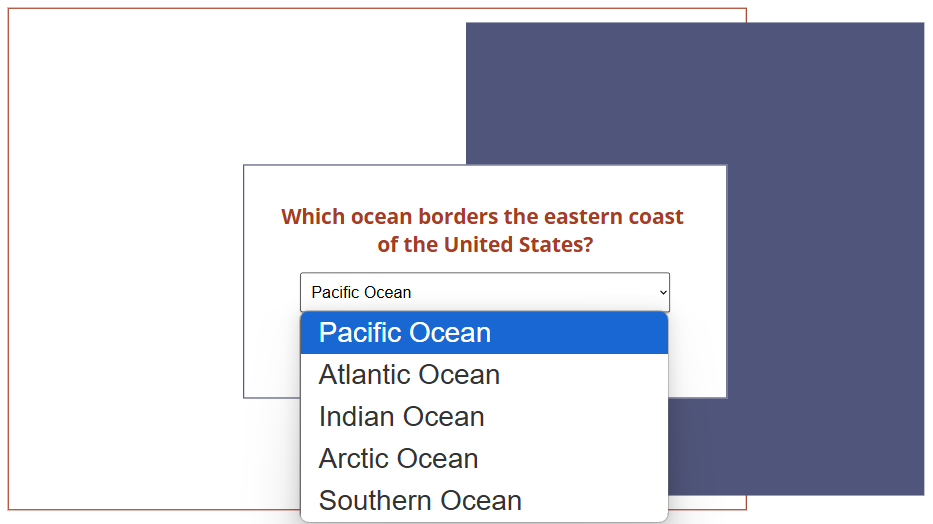
#7. Dropdown Questions
A Dropdown question presents learners with a dropdown list from which they select an option. This format is particularly effective for organizing long lists without cluttering the visual space. By clicking the dropdown menu, users can view and choose from multiple choices, maintaining a clean, organized design.
Dropdown questions work well when there are many possible answers—like selecting a country from a global list or choosing a category from a broad range. They help reduce input errors, standardize responses, and simplify data collection and analysis. This question type is especially useful in surveys, forms, and online assessments, offering a user-friendly experience.
Example applications:
- Survey: Asking respondents to select their age range, gender, occupation, or income level from a predefined list.
- Registration form: Choosing a country, state, or city when filling out an online registration form.
- Feedback form: Gathering feedback on products or services by selecting a category that best describes the user’s experience.
- Education and training platforms: Selecting a course topic, level of expertise, or preferred learning method.
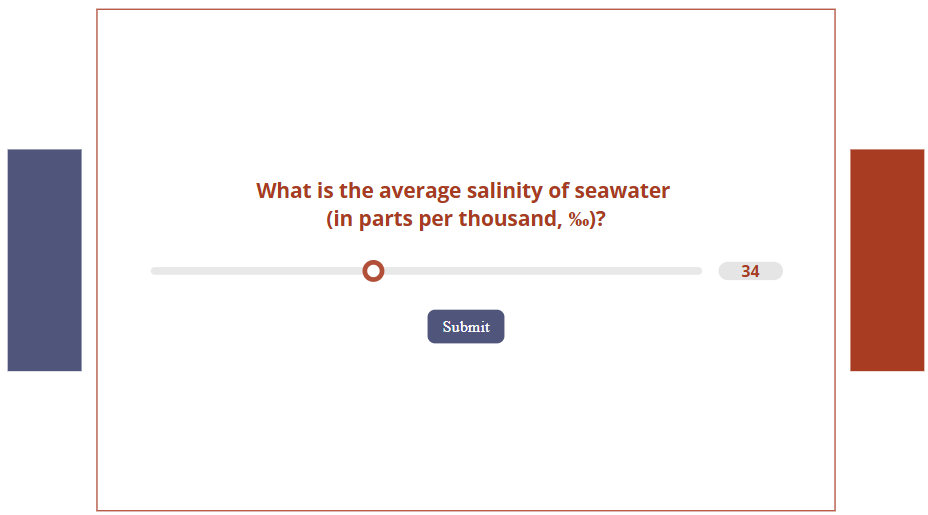
#8. Slider Questions
A Slider question features a single slider that users manipulate to select a value, such as a number, percentage, or level. The slider can use numerical scales, Likert scales (e.g., 1 to 10 for satisfaction), or continuous ranges, making it a versatile choice for surveys, assessments, and data collection. This interactive format allows for more precise input and is effective for measuring opinions, quantities, or preferences.
Example applications:
- Science & Physics: Adjusting temperature, speed, or weight values in simulation experiments.
- Market Research: Rating customer satisfaction on a scale from 1 to 10.
- Health & Fitness: Indicating pain levels or tracking daily calorie intake.
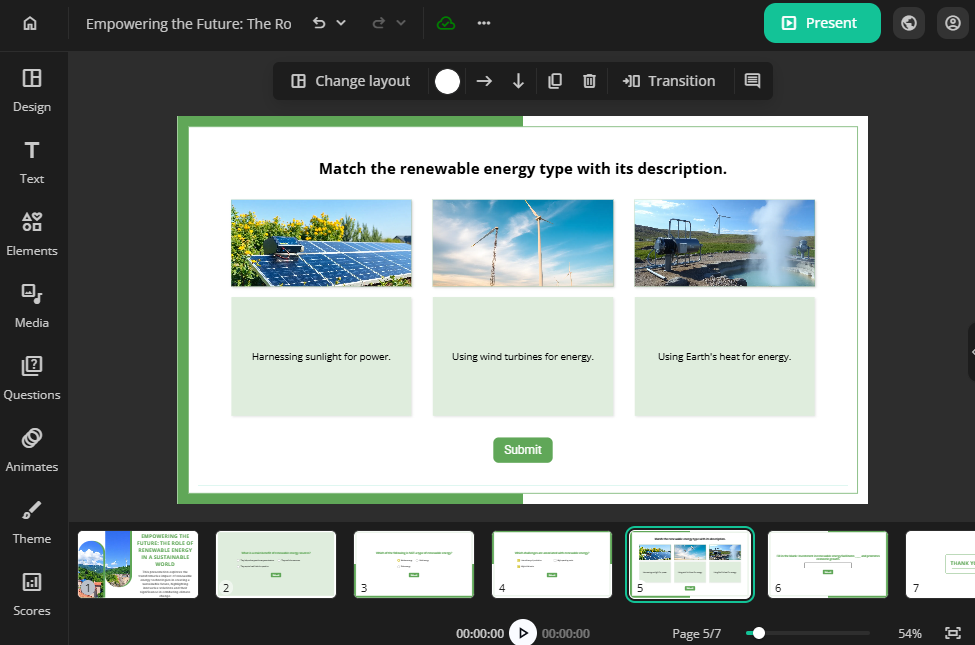
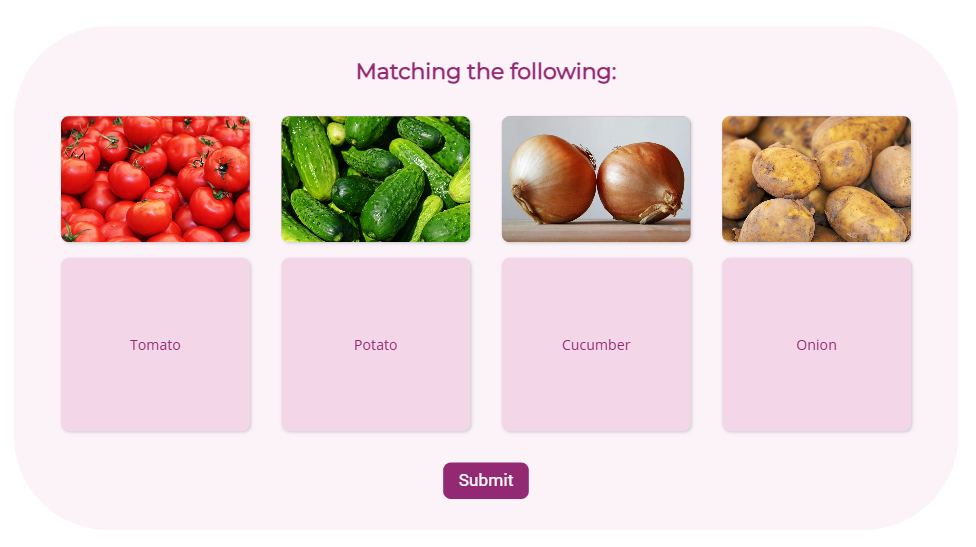
#9. Matching Questions
A Matching question, also called a Drag and Drop question, features two sets of items arranged in columns or rows. One set includes ‘prompts’ (such as terms, names, or images), while the other contains corresponding ‘responses’ (like definitions, dates, or descriptions). The user’s goal is to correctly pair the items by dragging and dropping them. This question format is widely used in quizzes and assessments to evaluate knowledge and understanding of conceptual relationships.
Example applications:
- Geography: Connecting countries with their capitals.
- Science: Matching chemical elements with their symbols.
- History: Connecting historical events with their corresponding dates.
- Language Learning: Matching words with their translations.
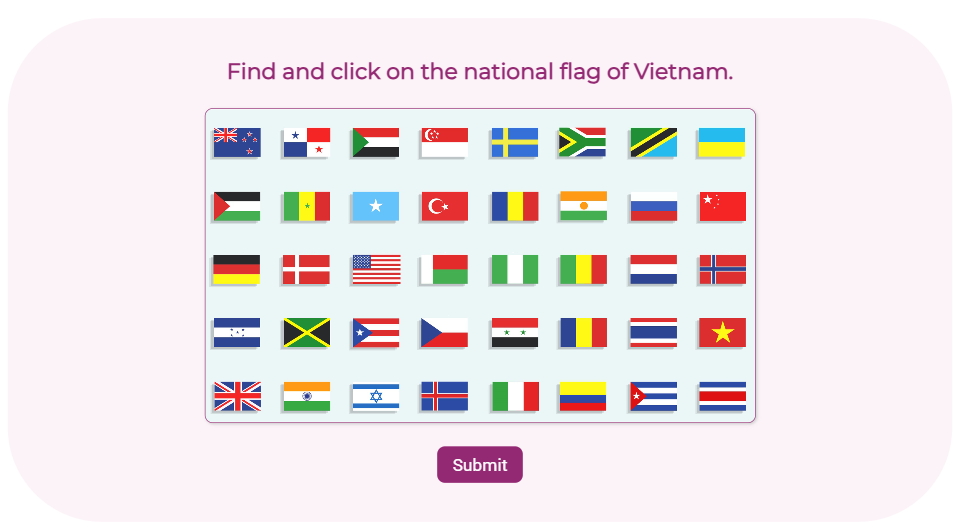
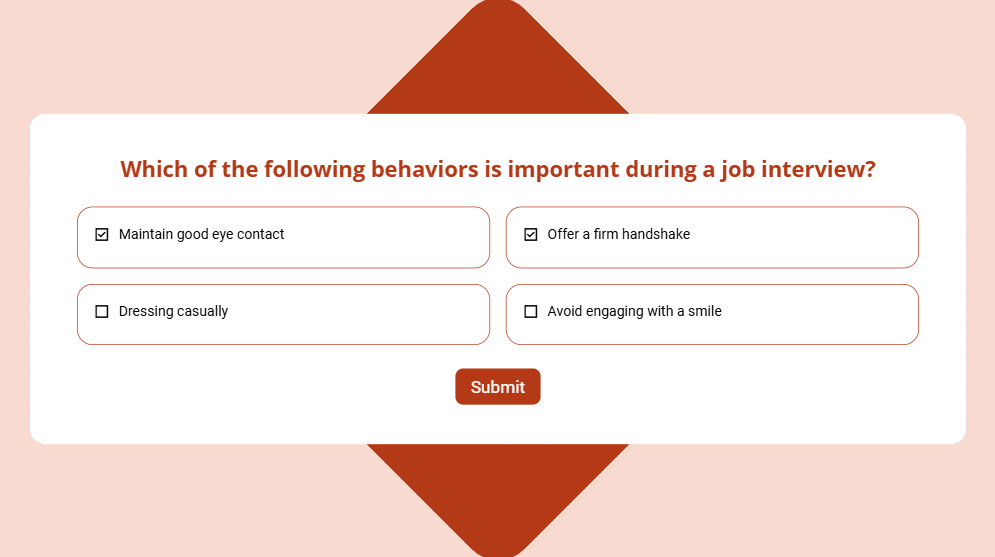
#10. Hotspot Questions
A Hotspot question is also a common question type in eLearning. This question includes an image and requires users to click on specific areas of an image as answer. This format is widely used to test visual recognition, spatial awareness, and understanding of key elements within an image.
Example applications:
- Geography: Pinpointing countries, cities, or landmarks on a map.
- Biology: Clicking on parts of a plant or animal cell.
- Traffic Safety: Identifying road signs or hazardous areas in a driving scenario.
- Medical training: Pointing out body parts or organs.
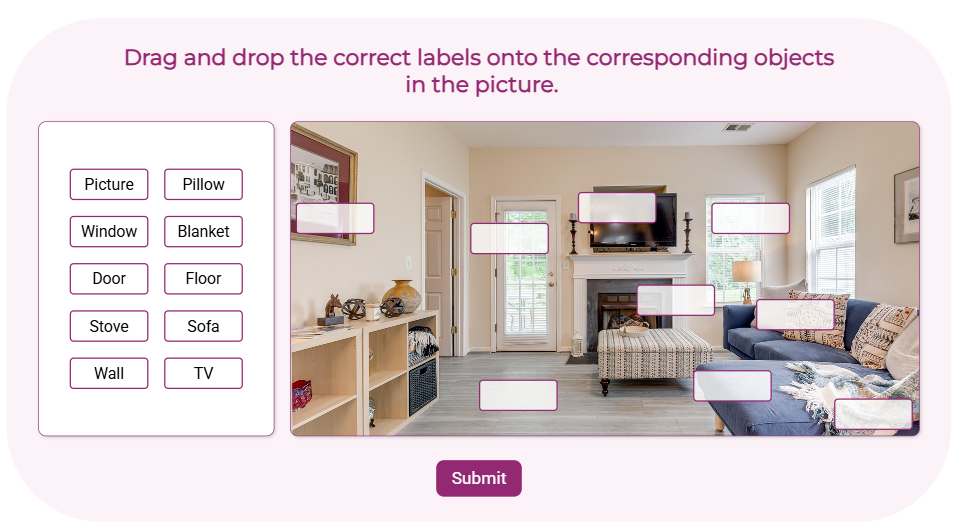
#11. Label Questions
A Label question is quite similar to a Hotspot question. Both of them require users to identify specific areas on an image. However, instead of clicking on a predefined area (as in Hotspot questions), users drag and drop labels from a list onto the correct locations within the image. This question type is widely used in assessments to test knowledge of diagrams, structures, or visual components.
Example applications:
- Language learning: Naming objects in foreign languages.
- Geography: Labeling continents, oceans, mountain ranges, or key landmarks.
- Medicine & Healthcare: Naming bones, muscles, or regions of the brain.
- Astronomy: Labeling planets, constellations, or parts of a telescope.
- History: Identifying key locations on historical battle maps.
Conclusion
In summary, the 11 common question types in eLearning – from True/False to Hotspots – each serve distinct purposes in driving engagement and understanding. By strategically using these formats, educators can shift from passive delivery to active learning, fostering critical thinking and deeper knowledge retention. Ultimately, interactive questions transform eLearning into a collaborative and impactful learning experience. Elevate your eLearning with uPresenter – an AI presentation and quiz maker, and unlock the full potential of these question types.
See more:
How to Create Interactive Quizzes in uPresenter – A Complete Guide for Beginners
How to Create Interactive Quizzes in uPresenter – A Complete Guide for Beginners
Interactive quizzes are an excellent way to test knowledge, reinforce learning, and keep participants engaged throughout lessons. If you’re looking for a free online quiz generator that enables you to create interactive quizzes quickly and effortlessly, uPresenter is here to help.
uPresenter is an innovative, AI-powered tool designed to streamline the creation of eLearning content, particularly presentations and quizzes. It aims to alleviate the time-consuming and often challenging process of developing visually engaging and informative materials. In this article, we’ll explore how to generate interactive quizzes in minutes using uPresenter. Whether you’re an educator, trainer, or business owner, you’ll learn how to create engaging quizzes that cater to your specific needs.
Get Started with uPresenter
Before diving into the nitty-gritty of creating interactive quizzes, you can try uPresenter for free on this website: uPresenter – Interactive Platform for eLearning Content Creation.
To begin, sign up or log in with your Google account. Once you’re logged in, you’ll be taken to the uPresenter homepage.
Create Interactive Quizzes in uPresenter
uPresenter offers two ways to create quizzes: AI-powered quiz generation and manual quiz creation.
Generate Quizzes Using AI Power
Let’s start with the AI-powered quiz generation feature, which is a game-changer for educators and content creators.
To create a quiz using AI in uPresenter, follow these steps:
- Click on Create with AI button on the homepage.
- Enter your topic and notes if needed.
- In the Content Options section, select Quizzes only.
- The generated outline will show the title and number of questions in your quiz. You can add more or delete any question you want.
- Choose a desired template for your quiz.
- Click Generate. And just like that, your quiz is ready.
After generating your quiz, you can edit questions to make them more personalized. This AI quiz generation is perfect for educators, trainers, and businesses looking to create interactive quizzes fast while maintaining quality.
Create Interactive Quizzes Manually
If you prefer full control over your quiz creation, uPresenter interactive quiz builder allows you to create quizzes manually with 11 different question types:
- Multiple Choice
- Multiple Response
- True/False
- Short Answer
- Sequence
- Essay
- Dropdown
- Slider
- Matching
- Hotspot
- Labeling
You can find all the question types in the Questions section on the left pane. All question types are prebuilt, so you don’t need to configure anything more.

Let’s create a Multiple Choice question as an example. Simply click on the question type, enter your question title and answer options, then click on an option to set it as the correct answer, and you’re done!
Enhance Learner Engagement
To take your quiz to the next level, enhance learner engagement by inserting multimedia elements such as images or videos. For image-based questions like Hotspot or Labeling, uPresenter allows you to generate AI-powered images with various styles, aspect ratios, and models.
Support Question Feedback & Reporting
uPresenter offers some extra features to make your quiz more interactive:
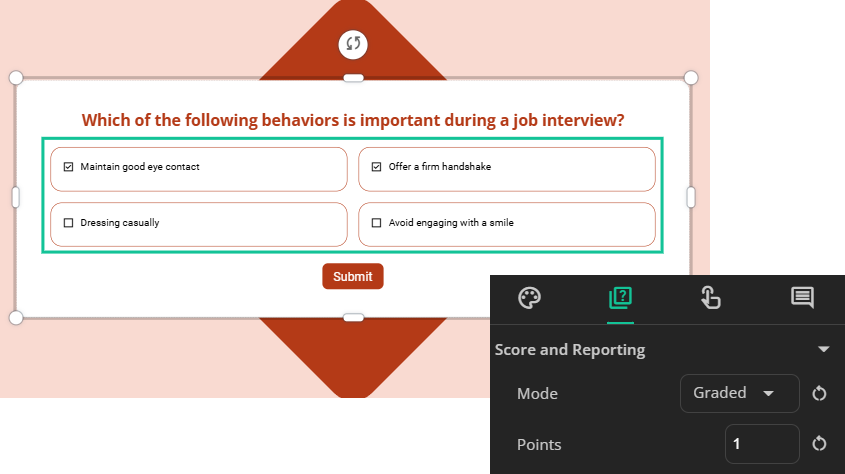
- Instant feedback is added to questions to guide learners whether their answer is right or wrong.
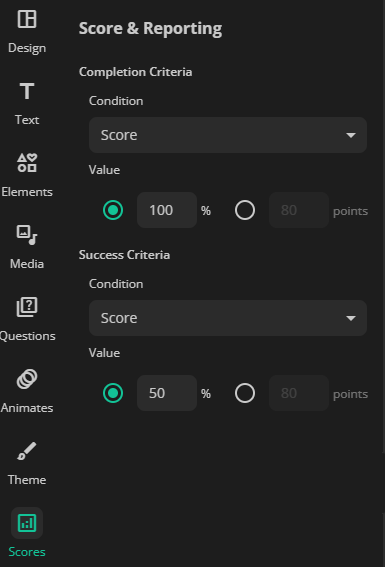
- A predefined point is given to each question. The total points will be calculated as the condition for the completion or success status of the quiz.
You can change the default feedback and question point by selecting the answer area of a question, then navigate to the Questions tab of the Properties pane.
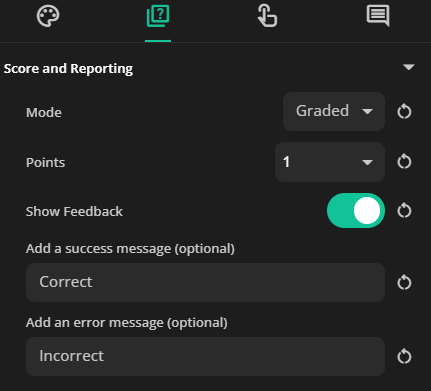
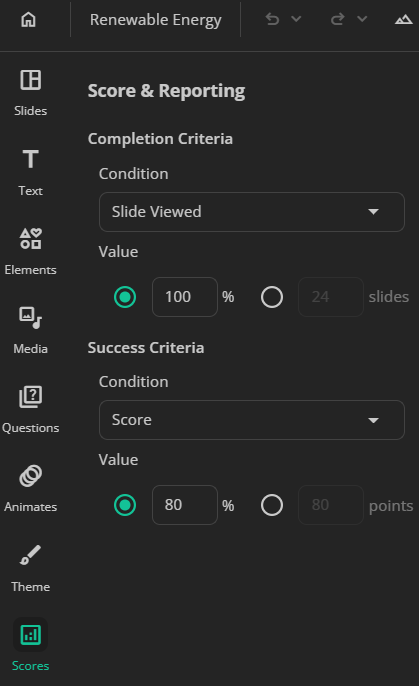
After that, you can set these conditions in the Scores section in the left pane like this:
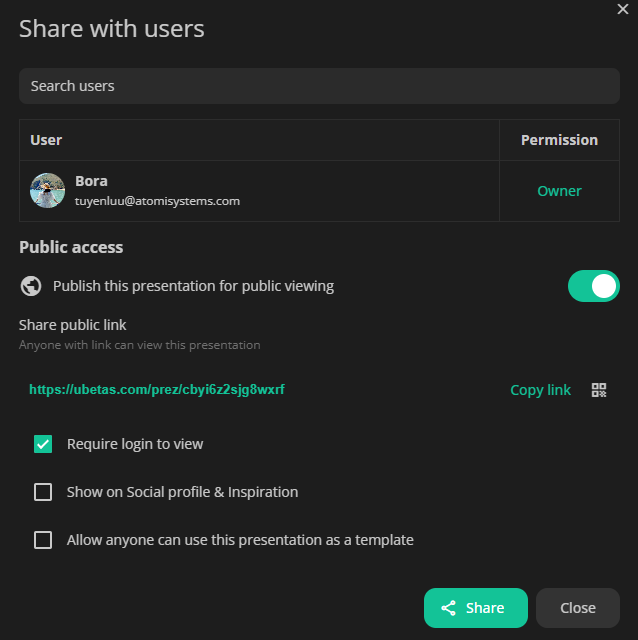
Publish and Share Your Interactive Quizzes
When you’re ready, publish your quiz and share it with your learners. Don’t forget to select the Require login to view checkbox if you want to collect your learners’ identity. If not, they will be anonymous users.
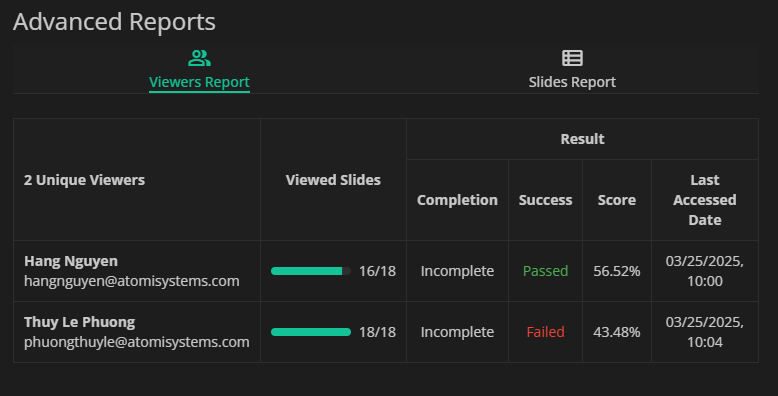
Lastly, see the report of your learners’ performance by clicking on the Report icon at the top-right corner of the working window. This report shows the learners’ completion and success status, quiz scores, and the number of slides viewed. You can click on each learner’s name to see their responses for each question.
You can even export the quiz to an xAPI package and then upload it for LMS integration. With just a few clicks, your quiz is ready to be shared with the world!
Ready to create interactive quizzes? Sign up for uPresenter now and start building engaging quizzes in minutes.

See more:
- How to Create Shareable eLearning Lessons with a Free AI Tool for Beginners
- Best Free AI-Powered eLearning Quiz Generator 2025 – uPresenter Guide for Beginners
How to Create Shareable eLearning Lessons with a Free AI Tool for Beginners
Shareable eLearning lessons benefit both creators and learners: creators gain wider reach and cost-effective scalability, while learners enjoy accessible, flexible, and convenient learning anytime, anywhere. This fosters knowledge sharing and enhances learning outcomes. Creating engaging eLearning lessons can feel overwhelming, but it doesn’t have to be. In this post, we’ll show you how to create shareable eLearning lessons using a fantastic free tool called uPresenter. To the end of this article, you’ll know all necessary steps to create start to finish.
What is uPresenter?
uPresenter is an AI-powered presentation tool designed to help users create professional slides quickly and efficiently. It automates the process of generating presentation content, making it ideal for students, educators, and professionals who need to create shareable eLearning lessons with minimal effort.
Key features of uPresenter:
- AI-generated slides: Instantly create well-structured slides based on input topics.
- Quiz creation: Generates quizzes from presentations for interactive learning.
- Result tracking: Create detailed reports to track learner progress in real-time.
- Multimedia integration: Supports text, images, and other media for engaging presentations.
How to Create Shareable eLearning Lessons in uPresenter?
Create an Account
First, head over to https://upresenter.ai/. You’ll need to create an account or log in if you already have one. The process is quick and easy.
Create Shareable eLearning Lessons
Once you’re in the uPresenter workspace, follow these steps:
- Click Create with AI.
- Enter your lesson topic, choose whether you want to include quizzes, and customize the category, style, and language to suit your needs.
- Click Continue, and uPresenter will generate a lesson outline for you in just a few seconds.
- Edit lesson outline: Hover the mouse over each point, click to edit text. Besides, you can add, delete, reorder points, and create sub-points to structure your lesson perfectly.
- Click Continue.
- Select a template that complements your content. uPresenter offers a variety of templates to give your lesson a professional look.
- Click Continue, then wait for uPresenter to generate the lesson as settings.
Edit the Generated Lesson
You can add your personal touch to the lesson to make it more unique and personalized. uPresenter provides a range of editing tools to refine your AI-generated lesson.
- Edit the text using AI assistance: Select the text, click Ask AI, and choose a prompt or type your own.
- Edit image: Images can be regenerated or created from scratch with AI prompts.
- Edit slide elements: The left pane offers a toolbox for adding text, elements, media, questions, and even animations to make your lesson truly engaging.
Preview, Publish and Export
When everything’s done, you can click Present or press ALT + P to preview your lesson.
Once you’re happy with it, it’s time to share it!
uPresenter offers several ways to share your eLearning content.
- Click the lock icon in the top right corner to publish your lesson and generate a shareable link.
- For offline access, you can also download your lesson as a PDF file for printing. Click the Download button > File PDF.
- For LMS integration, you can also download it as an xAPI package. Click the Download button > xAPI Package.
And that’s it! Creating shareable eLearning lessons with uPresenter is quick, easy, and free.
Start exploring its AI-powered features today and share your knowledge with the world.
See more:
Best Free AI-Powered eLearning Quiz Generator 2025 – uPresenter Guide for Beginners
Best Free AI-Powered eLearning Quiz Generator 2025 – uPresenter Guide for Beginners
In this article, we introduce uPresenter, the best free AI-powered eLearning quiz generator, and guide you through the process of creating engaging eLearning quizzes effortlessly.
Quizzes in eLearning are valuable tools that actively engage learners and reinforce knowledge retention. They provide instant feedback for better understanding and progress tracking, while also helping educators efficiently assess student comprehension, creating effective learning experience.
When using an eLearning authoring tool to create quizzes, you typically have to manually add each question, input text, and configure settings, which can be time-consuming. However, with AI, this process becomes faster and more efficient, saving time while maintaining quality.
An AI-powered eLearning quiz generator is a tool that uses artificial intelligence to help educators, trainers, and content creators automatically generate quizzes for online learning. Instead of manually creating questions, AI analyzes the provided content and suggests or generates quiz questions instantly.
What is uPresenter?
uPresenter is an online platform that uses AI to help you create quizzes and presentations easily and quickly. At present, uPresenter supports 8 question types to help users create quizzes, surveys, and interactive presentations.
- True/False Question: It is ideal for testing basic knowledge or verifying statements.
- Multiple Choice Question: Users have to select one correct answer from multiple options. It’s great for assessing understanding of specific topics with clear answers.
- Multiple Response Question: This question type allows users to select more than one correct answer. It’s useful when a question has more than one valid response, encouraging deeper comprehension.
- Fill in Text Entry Question: It requires users type in their answer in a blank text field. This question is effective for testing recall and exact wording of terms or facts.
- Sequence Question: This question requires users to arrange items in the correct order. It’s ideal for evaluating knowledge of processes, sequences, or logical steps.
- Essay Question: This is an open-ended question, allowing users to express their ideas freely.
- Dropdown Question: It requires users to select an option from a dropdown list. This question type is great for long option lists while keeping a clean design.
- Slider Question: Users have to adjust a slider to select a value. It’s suitable for rating scales, measuring opinions, or collecting numerical responses.
Additionally, uPresenter is continuously updated, with plans to support more question types in the future. Particularly, in the next update, uPresenter will support 3 more question types which are Matching, Hotspot, and Labeling questions.
How to Create eLearning Quizzes Using AI in uPresenter?
Create an Account
First, visit upresenter.ai and sign up for an account, or log in if you already have one. You can also sign in quickly using your Google account.
Create eLearning Quizzes in uPresenter
Once you’re in the uPresenter workspace, do as follows:
- Click Create with AI.
- Enter your topic into the Presentation Title field.
- Select the Content Options as Quizzes.
- Customize Category, Style, and Language to suit your needs.
- Click Continue, and uPresenter will generate a quiz list for you in just a few seconds.
- Edit, add more, remove or reorder questions in the list.
- Click Continue.
- Select a template that complements your content. uPresenter offers a variety of templates to give your quizzes a professional look.
- Click Continue, then wait for uPresenter to generate the eLearning quizzes as settings.
Add a New Question
Besides, you can add new questions as you want. For example, I add a Fill in Text Entry question.
- Click Questions on the left menu.
- Select Fill in Text Entry Question.
- Click the question title to enter your question.
- Add the correct answers to the question: Click the text entry > click the Change answers button
> Add answer > type the correct answer into the blank.
- Tick or untick the Case sensitivity option. This option refers to whether uppercase and lowercase letters are treated as different or the same. For example: If case sensitivity is enabled, “Apple” and “apple” are considered different. On the other hand, if case sensitivity is disabled, “Apple” and “apple” are treated as the same.
- Set scores for this question: Click Question on the right menu, and adjust the score value if needed. By default, users will get 1 point if they answer correctly. In case you just want to collect information, you can change from Graded mode to the Survey mode.
Preview, Publish and Export eLearning Quizzes
When everything’s done, click Present or press the key combination ALT + P to preview all questions.
Once you’re happy with it, it’s time to share it! uPresenter offers several ways to share your eLearning quizzes.
- Share via a link or QR code: Click the lock icon in the top right corner. Then, select Publish this presentation for public viewing. uPresenter will generate a shareable link and QR code. Copy it and share the eLearning quizzes with others.
- Download as PDF file for offline access: Click the download button in the top right corner > File PDF.
- Download as an xAPI package for LMS integration: Click the download button in the top right corner > xAPI Package.
Conclusion
And that’s how to create eLearning quizzes in uPresenter – a free AI-powered quiz generator. Follow our Blog and YouTube channel for more helpful articles and videos.
Best Free AI-Powered Presentation Maker 2025 – uPresenter Guide for Beginners
Struggling to create eye-catching presentations without spending hours on design? Meet uPresenter, the free AI-powered presentation maker that transforms your ideas into stunning slides in minutes—no design skills required!
Artificial intelligence (AI)-powered tools have revolutionized the way we create presentations, making it easier and faster to produce high-quality slides. Among these tools, uPresenter stands out as the best free AI presentation maker. A quick and efficient way to deliver engaging presentations, uPresenter is ideal for students, educators, professionals, and content creators alike. Let’s take a look at how to use uPresenter to create stunning presentations in this beginner’s guide.
Why Choose uPresenter?
uPresenter is a powerful presentation and quiz maker powered by AI, which streamlines your designing process for engaging eLearning content. Here are some main features that make uPresenter stand out:
- Automated content creation
The free generator utilizes AI to automatically create dynamic presentation slides and quizzes based on provided content, keyword, topic, or imported files such as MS Word, PDF, or PowerPoint presentations.
- Interactive quiz integration
Apart from AI-generated questions, uPresenter integrates various built-in quiz types, from true/false, multiple choice, dropdown to fill in text entry and essay. It allows real-time engagement during or after the presentation.
- Customizable template
A variety of customizable templates are available to suit different presentation styles and branching needs, which enhances visual appeal and professionalism.
- Advanced AI capabilities
uPresenter leverages AI assistance to enhance both text and images, refining your text for clarity, conciseness, and impact and replacing an image with another just by entering an AI prompt.
- Real-time collaboration
This free presentation and quiz generator enables seamless real-time collaboration, allowing multiple users to edit, comment, and refine presentations simultaneously. With cloud-based storage, team members can access and work on the same project from any device, ensuring smooth communication and workflow.
- Analytics & reporting
The presentation performance and audience engagement can be tracked with the powerful analytics and reporting tools in uPresenter. With real-time insights such as the number of slides viewed, completion and success status, and audience quiz scores, you can enhance your content for better impact.
- LMS seamless integration
uPresenter allows downloading the presentation and quizzes as an xAPI package that can be uploaded to any LMS (Learning Management System) that supports this learning standard.
How to Use uPresenter – Step-by-Step Guide for Beginners
Discover how beginners can effortlessly create and refine professional slides using uPresenter, the free AI-powered presentation and quiz maker.
Follow these steps:
- Sign up and get started
- Create a new presentation with AI
- Edit the presentation
- Add & edit interactive questions
- Preview the presentation
- Share & collaborate with team
- Publish the presentation
- Analyze & report the audience performance
Let’s get going.
Step 1. Sign up and Get Started
First, you need to come to uPresenter’s website and sign up for a free account. You can sign in with Google or simply enter your email address, name and password.
Once you finish, you will land on the Homepage. At the top left is the user profile where you can set up your profile, change the theme and language of the working space.
Down below is the navigation bar where you can view templates, access the user-created presentations, or refer friends to get more credits.

Step 2. Create a New Presentation with AI
As a free AI presentation generator, uPresenter lets you generate engaging presentations and quizzes automatically with just a few clicks. There are three ways to do that.
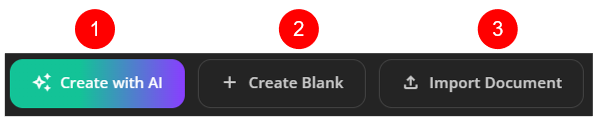
The first one is to generate a new presentation using an AI prompt.
The second one is to build a new blank presentation using editing tools from basic to advanced.
And the last one is to create a presentation based on the content of the document you import.
Now let’s go with creating a new presentation with AI.
Take the following steps:
- Click on the Create with AI button.
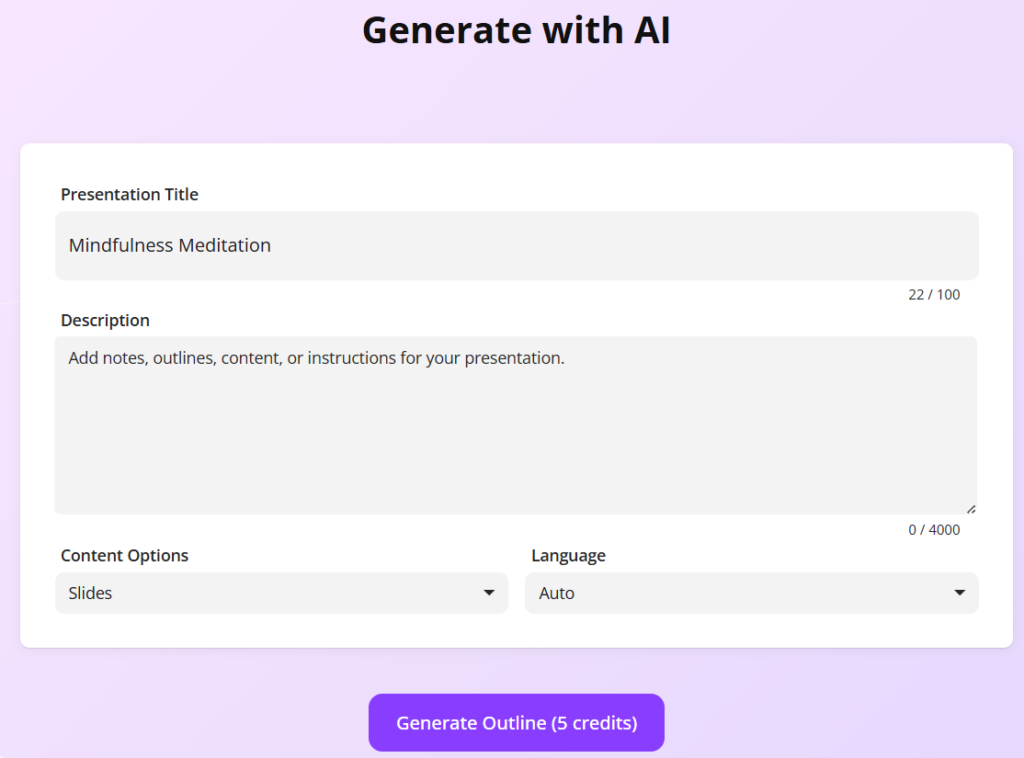
- In the Create a presentation with AI dialog that appears:
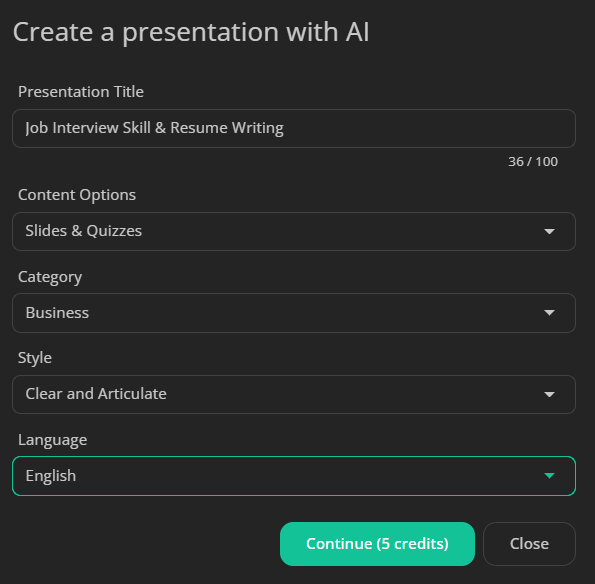
- If you have a topic in mind, just type it in.
- Choose to create a presentation with slides, quizzes, or a mix of both.
- Select a category, preferred style, and language for your presentation.
- Once you’ve set the basics, refine your ideas by structuring an outline. You can customize the outline by adding or removing points as needed.
- Choose a theme. There are several themes with different layouts. You can preview how your content will look with each theme.

When you’re satisfied, click Continue to generate your presentation.
Your presentation is now ready, complete with automatically generated content, including slides and quizzes as specified.
Step 3. Edit the Presentation
uPresenter not only enables you to generate dynamic presentations and quizzes automatically, this free AI presentation maker also offers editing tools from basic to advanced to enhance your presentation.
First, take a look at the user interface of the working window.
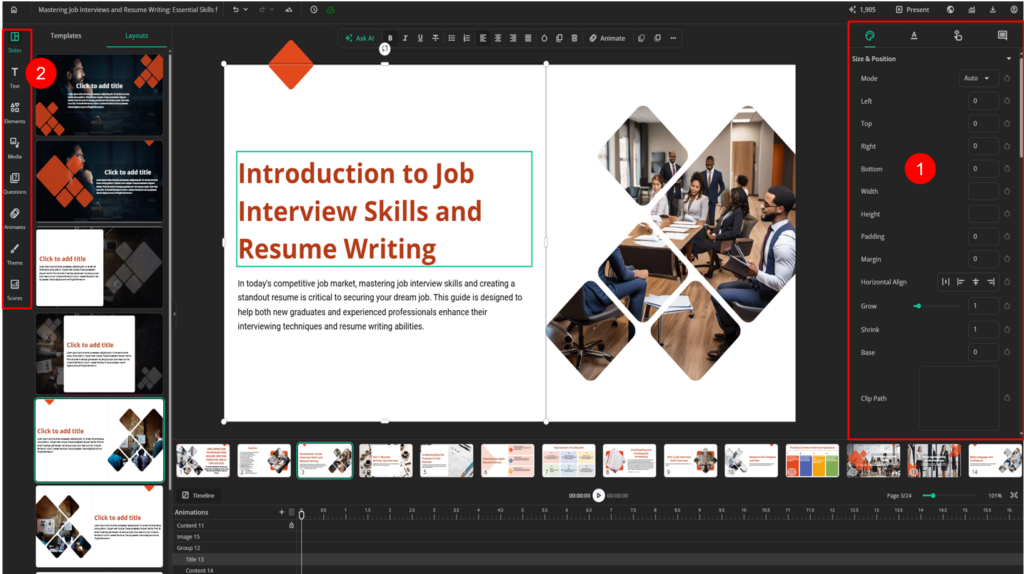
- On the right side, you can find all the properties of an element in the presentation. It’s called the Properties pane (1). This pane has fixed tabs such as Styles tab (to change size, position, or filter effects) and contextual tabs such as Text tab that appears when a text is selected.
- On the left sidebar (2), there are various element types including custom-styled texts, shapes, buttons, charts, audio tracks, YouTube videos, and more. It’s easy to add elements to the presentation with a few clicks.
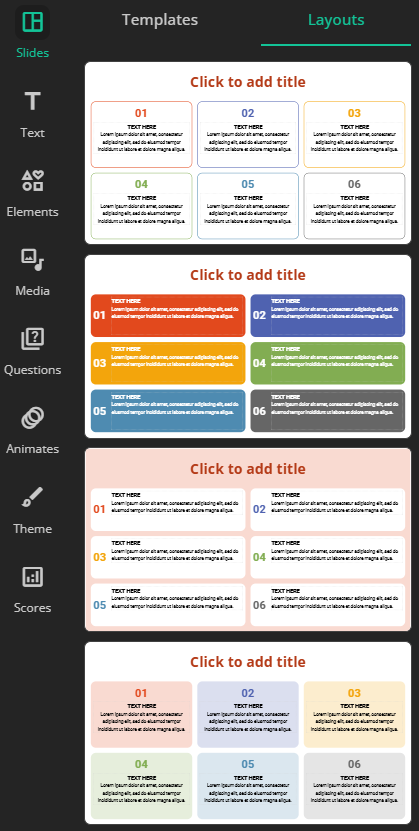
- Each slide type has different layouts. To change to another slide layout, you click on the Slides button in the left sidebar and select Layouts.
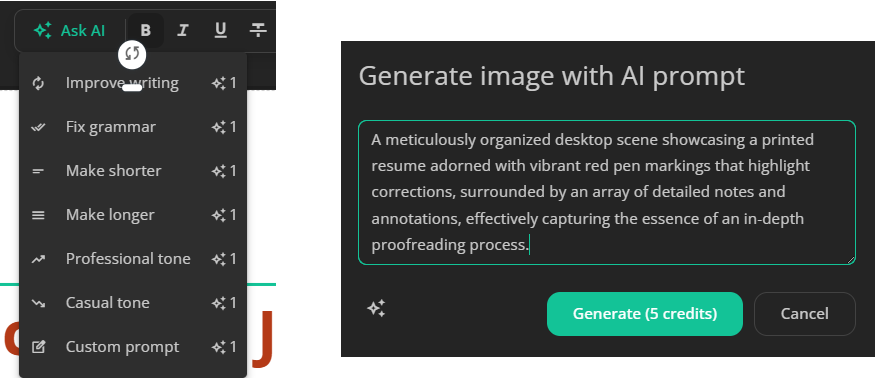
- As an AI presentation maker, uPresenter also leverages the power of AI to help you enhance your text and image. You first select an image or a text, click on the Ask AI button at the top of the Canvas. AI assistance allows you to adjust text to match your preferences or seamlessly replace images using AI-generated prompts.
Step 4. Add & Edit Interactive Questions
In uPresenter, you can enhance audience engagement by inserting interactive questions manually, in addition to AI-generated ones. The free AI presentation and quiz maker provides a variety of built-in question types, including:
- True/False question
- Multiple Choice question
- Multiple Response question
- Fill in Text Entry question
- Sequence question
- Dropdown question
- Slider question
- Essay question
This allows you to tailor assessments to your specific needs, ensuring better knowledge retention and participation. Simply select a question type in the Questions in the left sidebar, customize the content, and integrate it seamlessly into your slides for an interactive and dynamic presentation experience.
Moreover, each question has a predefined point if you choose the correct answer but you can change it easily. To do that, you select the answer area, then navigate to the Properties pane > Question tab > change the points.
You can set the total points of questions or the number of slides viewed as the completion or success status for the presentation in the Scores button in the left sidebar. The reporting will be discussed later so stay tuned.
Step 5. Preview the Presentation
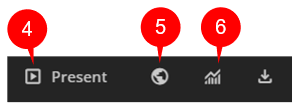
The preview feature allows you to review their presentation before finalizing them. To preview the presentation, you click on the Present (4) button at the top right corner of the working window.
When in the preview mode, you can select any slide to preview, view in full-screen mode or share the presentation on various social media platforms.
Step 6. Share & Collaborate with Team
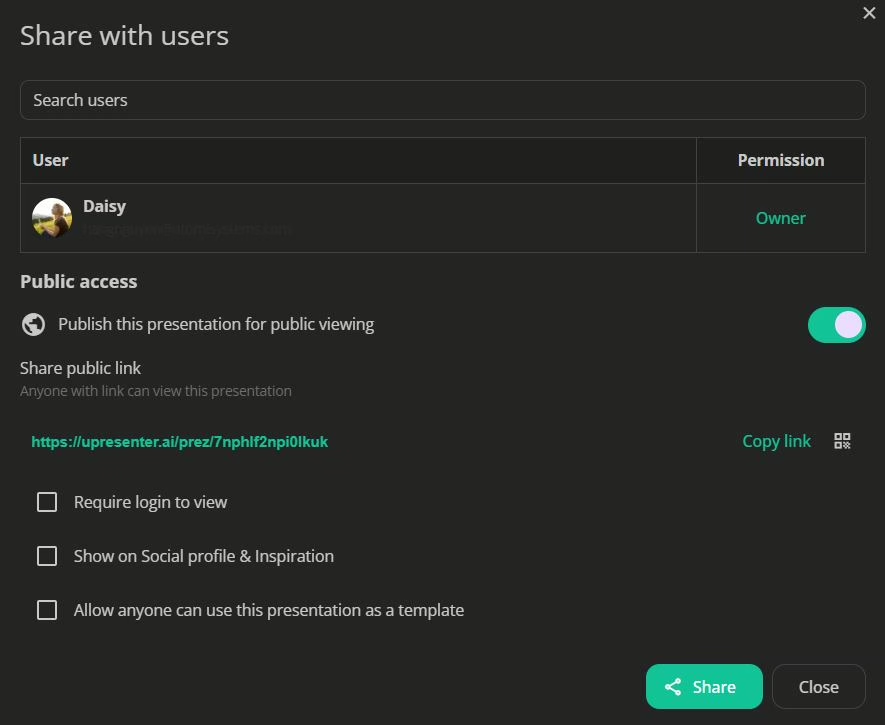
uPresenter is a free, cloud-based AI-powered presentation tool that works without any installation. It enables seamless collaboration, allowing team members to work on the same presentation from any device and location. To team up on the presentation, you first click on the globe icon (5) to open the Share with users dialog.
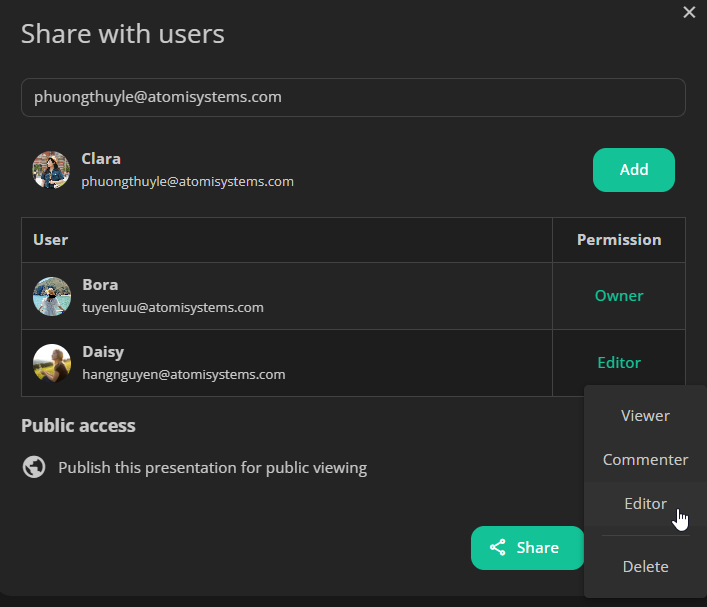
- Enter the email address of your collaborator(s).
- Set the access level for them to view, comment, or edit the presentation.
- Lastly, click Share.
After that, the pointer(s) of your collaborator(s) will be displayed on the Canvas in real-time.
They can also leave comments at any slide in the Comments tab of the Properties pane.
Step 7. Publish the Presentation
Once you’re satisfied with the result, just publish your presentation for public viewing. In the Share with users dialog mentioned earlier, you turn on the publish button.

You can require others to login to uPresenter so that they can view. Otherwise, they will be anonymous users. Then, copy the link and click Share to send it to others.
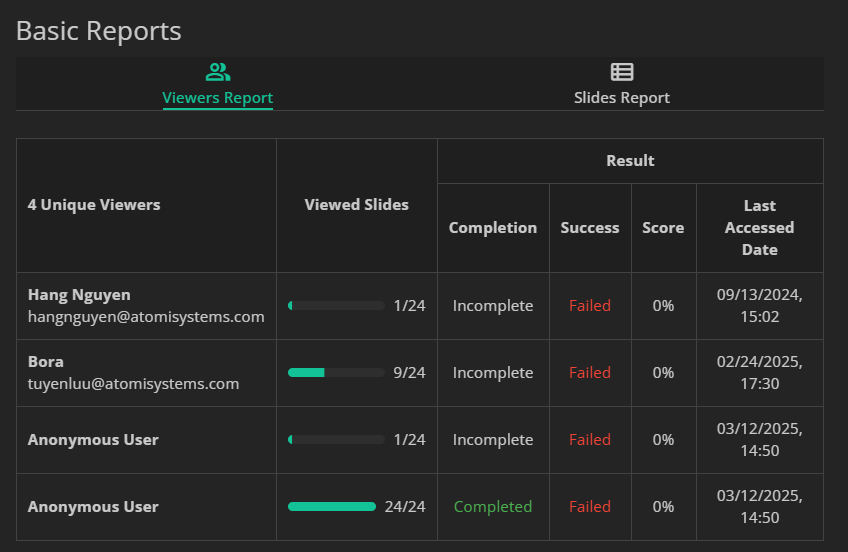
Step 8. Analyze & Report the Audience Performance
uPresenter offers powerful analytics and reporting tools to help you evaluate your audience performance. It tracks key metrics such as the number of slides viewed, completion and success status, and quiz scores, providing detailed insights into how well the presentation resonates with the audience. These reports allow presenters to identify areas for improvement, refine their content, and enhance future presentations for better effectiveness.
Click on the Report button (6) to see all the reports.
Conclusion
uPresenter is a game-changer in AI-powered presentation generation, offering free access to powerful tools that streamline the design process. As a free AI presentation maker, it not only helps users create professional slides effortlessly but also enhances engagement with built-in quizzes for interactive learning. Whether you need a quick, professional-looking presentation or a fully customized slide deck, uPresenter makes it easy and efficient. Try it today and elevate your presentation skills with AI!
See more:
- How to Generate an Engaging Interactive eLearning Lesson with Quizzes in uPresenter
- 7 AI Tools for Your Next-Level Business Growth – uLearnBox
- Best-picked Popular AI Tools for Teachers
How AI Credits Work in uPresenter
AI credits in uPresenter are your gateway to unlocking advanced features like AI-powered slide generation, content enhancement, and quiz creation. Here’s a breakdown of how they work:
In this tutorial:
In uPresenter, credits are required to interact with AI features.
How many credits does it cost to use AI?
The cost varies depending on the activity.
- Generate outline: cost 5 credits to generate an outline
- Ask AI: responses cost 2 credits for images and 1 credit for text.
How to get more credits?
There are two main ways to earn additional credits in uPresenter:
1. Upgrade to the Pro Plan
The simplest option is upgrading to the Pro Plan, which provides 12,000 credits annually or 1,000 credits monthly. You can choose between a monthly or annual subscription by toggling the Monthly or Yearly option.
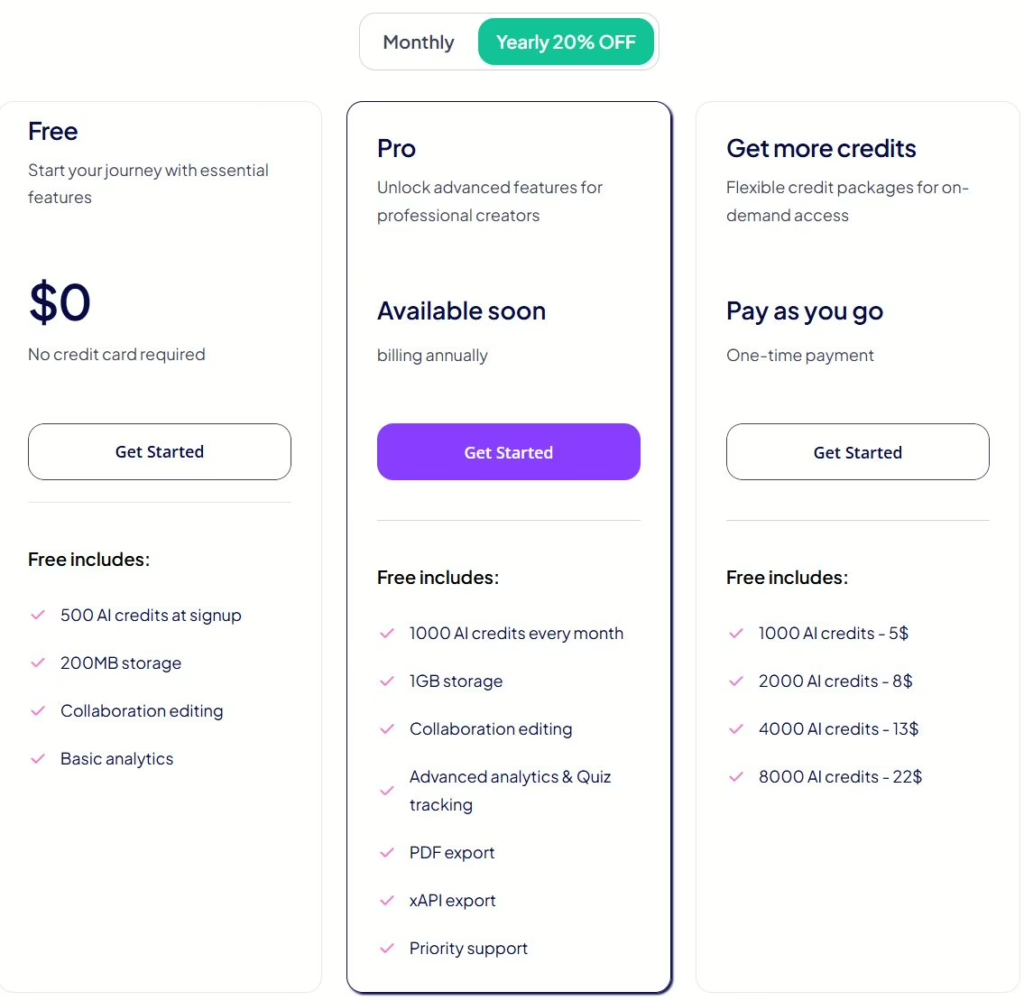
If you run out of credits, don’t worry – getting more is simple. You can also contact the uPresenter team to request more.
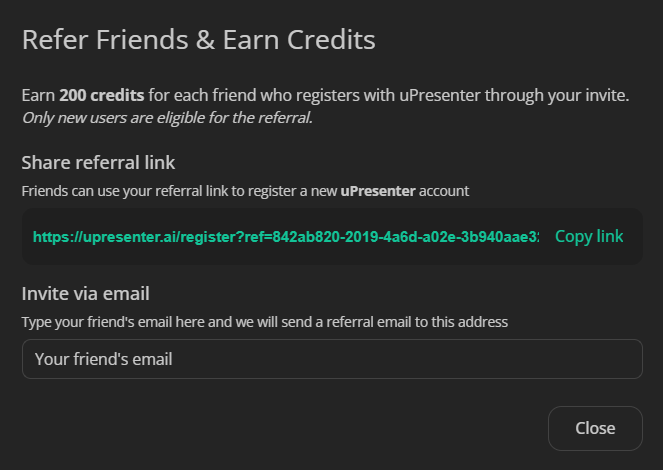
2. Earn Credits through Referrals
You can earn extra credits by referring friends to uPresenter. For every successful signup through your referral, you’ll receive an additional 200 credits in your account. To refer a friend:
- Log in to your account and click Refer a Friend.
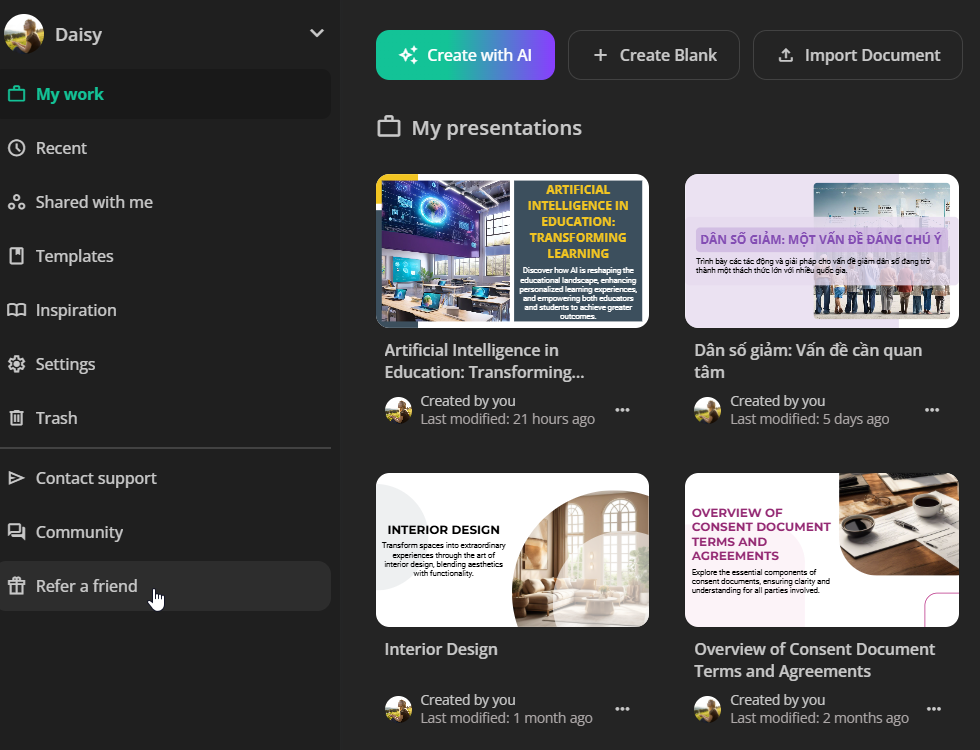
- Share the referral link by either copying it and sharing it directly or entering your friend’s email address to send the link via email.
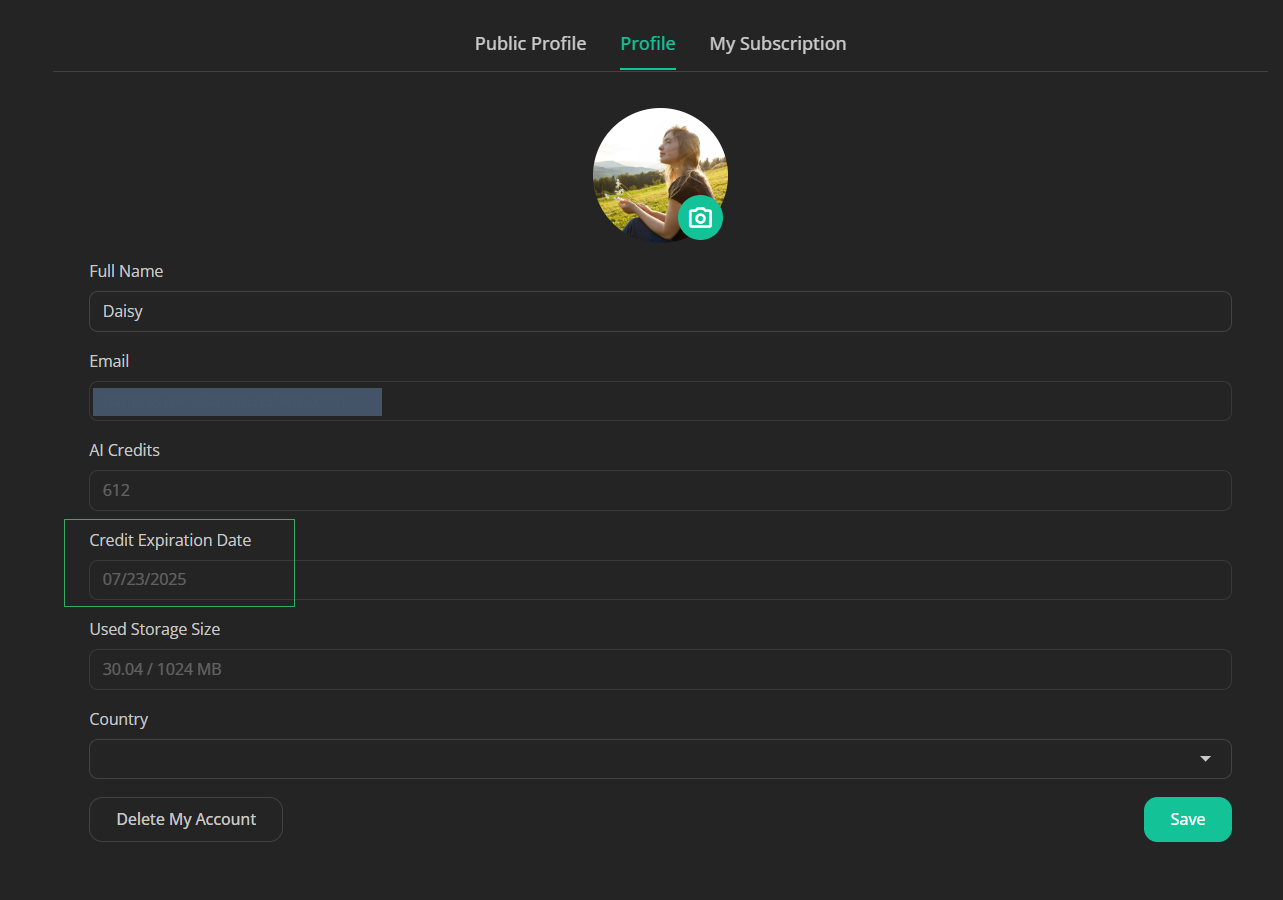
How long are your credits valid?
Credits are valid for one year from the date of purchase. You can check their expiration date in your Profile settings.
By managing your credits effectively, you can leverage uPresenter’s powerful AI tools to create stunning, interactive presentations with ease.
Related tutorials:
How to change user interface language
uPresenter: Beyond Slides & Quizzes – Your Ultimate eLearning Assessment Companion
When you think of uPresenter, the first things that might come to mind are its sleek presentation designs and easy-to-create quizzes. But did you know that it’s so much more than that? Beyond being a trusted AI presentation and quiz maker, uPresenter stands out as a powerful eLearning assessment tool that’s reshaping how educators and trainers evaluate learner progress.
This post’ll take you on a journey to discover how uPresenter can transform your eLearning experience. It’s a one-stop solution for anyone looking to elevate their training or teaching methods, from designing interactive assessments to tracking performance and analyzing learner outcomes. Whether you’re an educator, corporate trainer, or course creator, you’ll find out why uPresenter is the ultimate game-changer for eLearning assessments.
Curious to learn how it all works? Let’s dive in and unlock the full potential of uPresenter!
Introducing uPresenter: The All-in-One Solution
uPresenter is a revolutionary tool designed to streamline and enhance your presentation experience. Whether you’re a professional, educator, or student, uPresenter offers a comprehensive suite of features that cater to all your presentation needs. From intuitive slide creation and interactive quizzes to seamless integration with multimedia elements, uPresenter ensures your presentations are not only visually stunning but also highly engaging. Its user-friendly interface and robust functionality make it easy to create, edit, and deliver the content with confidence and ease. With uPresenter, you have everything you need in one powerful package to captivate your audience and convey your message effectively.
Key Features of uPresenter
- Slide creation: uPresenter leverages the power of AI to simplify the process of creating slides. All users need is to input a text prompt or document, and let uPresenter do the rest. It will suggest a professional presentation based on the input information. It just takes a few seconds, much faster than the traditional tools.
- Quiz maker: uPresenter supports 7 types of interactive quiz. It includes true/false, multiple-choice, multiple-response, fill-in-text-entry, essay, dropdown and slider questions. You are free to create and customize quizzes as you want.
- Tracking and reporting: uPresenter empowers educators and trainers with tools to track progress, and analyze learner performance.
Why Choose uPresenter for eLearning Assessment?
AI-Powered Assessment Design
- Smart question suggestions: AI algorithms can generate relevant questions based on keywords or uploaded documents. It helps save time and ensure topic alignment.
- Customizable question types: As mentioned above, educators can create a variety of question formats, such as multiple-choice, true/false, essay, etc. tailored to learning objectives.
- Interactive content: You can incorporate multimedia elements like videos, images, and audio clips to make assessments engaging and effective.
Built-in Tracking and Progress Monitoring
- Real-time reporting: Provide educators with learner reports in real-time. They can track learner activity as they engage with presentations and quizzes.
- Quiz result tracking: Track learner answers, score and pass/fail status.
- Completion metrics: Measures task completion rates, identifies drop-off points, and gathers insights on learner engagement.
Advanced Analytics and Performance Insights
- Automated grading: Streamline your workflow with instant grading and scoring for objective questions such as multiple-choice or true/false. For subjective responses like essays, enjoy the flexibility of manual evaluation.
- Detailed analytics dashboard: Access a visually rich dashboard that presents data on scores, response accuracy, and pass/fail outcomes, helping you make informed decisions.
- Learning gap identification: Detect areas where learners face challenges and offer targeted feedback or additional resources to bridge those gaps.
Integration with LMS
In addition to its robust built-in tracking and reporting features, uPresenter seamlessly integrates with Learning Management Systems (LMS). Educators can easily export presentations as xAPI packages, enabling smooth uploads to popular LMS platforms for centralized management and comprehensive tracking of learner progress.
Enhanced Collaboration
uPresenter fosters collaboration by allowing trainers and stakeholders to access and share detailed assessment insights. This enables teams to collectively analyze learner data, identify trends, and make informed decisions to refine curriculum design. By working together, educators can ensure that learning materials and assessments align with organizational goals, address diverse learner needs, and stay updated with the latest educational standards and practices.
How to Get Started with uPresenter?
Getting started with uPresenter is quick and straightforward. Follow these steps to unlock its powerful features for creating a presentation, quiz list, and eLearning assessment:
Step 1: Sign Up for an Account
- Visit the uPresenter website https://upresenter.ai/.
- Click on the Sign Up button and register using your email address.
- Enjoy a welcome bonus of 500 free AI credits to explore the platform’s features.
Step 2: Create Your First Project
Click the Create with AI button to begin your first project effortlessly. You can also convert existing documents into presentations with just a few clicks. For guidance, refer to Create a Presentation with AI in uPresenter, and Generate Questions from Text Using AI to get started.
Once your project is set up, enhance it further using the Ask AI feature. This tool lets you regenerate or improve slide content and quiz questions by simply entering a new prompt or using built-in commands for refinements.
Step 3: Share and Export Your Content
After creating your project, publish it and share the generated link or QR code with your learners for easy access. Alternatively, uPresenter provides flexible export options:
- PDFs: For offline access and easy distribution.
- xAPI packages: For seamless integration with popular LMS, ensuring comprehensive tracking and management.
Step 4: Track and Analyze Performance
Leverage uPresenter’s built-in tracking tools to monitor learner engagement and outcomes. Simply click the Report button to access detailed learner reports. These reports provide valuable metrics such as:
- Individual responses and scores.
- Completion status.
- Pass/fail results.
- Additional insights to identify learning gaps and trends.
With these analytics, educators and trainers can gain a deeper understanding of learner performance and make data-driven improvements to their content.
If you have any questions while using uPresenter to create a presentation or eLearning assessment, feel free to contact us. Besides, follow our Blog page for more helpful articles.
See more:
Maximizing Learner Engagement with uPresenter’s Real-Time Tracking
uPresenter Beta Updates on Dec 10: Drag-n-Drop, Transitions & Built-in Assets
Drag-n-drop, Transitions & Built-in Assets, these new updated features work together to streamline your eLearning content creation process, allowing for smooth slide transitions, customizable eLearning assets, and an intuitive editing experience.
1. Drag-n-drop Editor
This intuitive tool simplifies the creation process, allowing users to design presentations and quizzes with their full control.
With the Drag-and-Drop editor, you can easily add text, images, and multimedia elements directly onto your slides or quiz templates.
Moreover, you can move any elements on canvas with your mouse and directly set them in place without adjusting parameters.
- To active drag-n-drop, set the element(s)/group to Absolute mode.
- You can navigate to the Timeline at the bottom of the page to see all the elements and their layers.
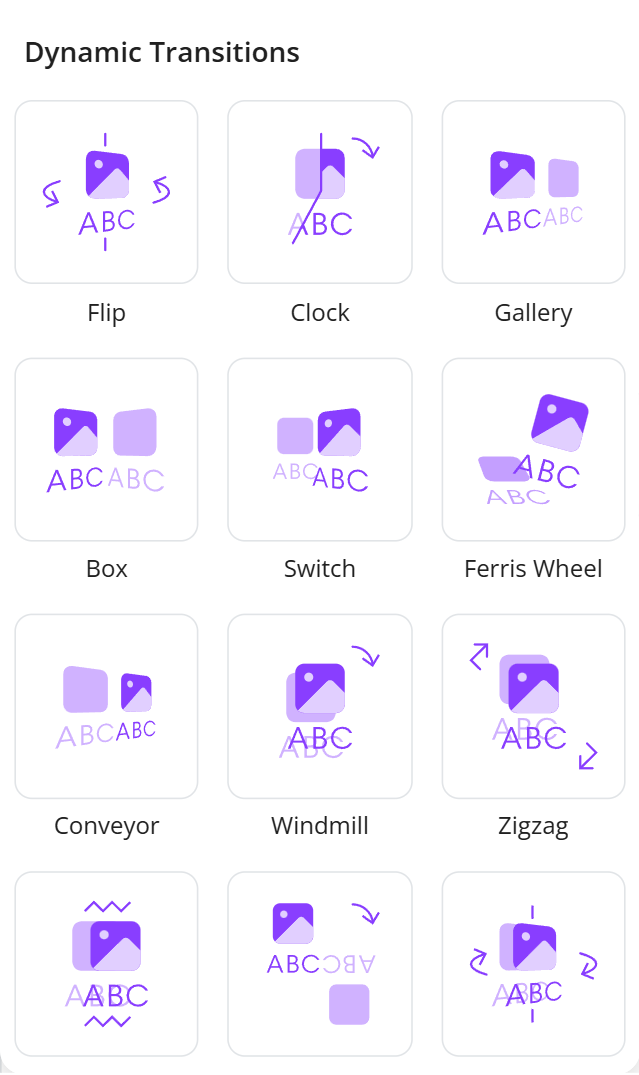
2. Transitions
This update enhances how you present your ideas by allowing smooth transitions between slides and individual elements within those slides, creating a more dynamic and engaging experience for your audience.
- Slide Transitions: Choose from a variety of visually appealing transition effects that seamlessly connect your slides, ensuring a professional flow throughout your presentation.
- Element Transitions: Animate individual elements such as text, images, and charts to select the way they appear or disappear with style, adding emphasis and keeping your audience captivated.
- Customization Options: Control the timing and direction to match your presentation’s tone and pacing, making it easier to create a consistent presentation.
You can add transitions by heading to the Animates tab in the left sidebar.
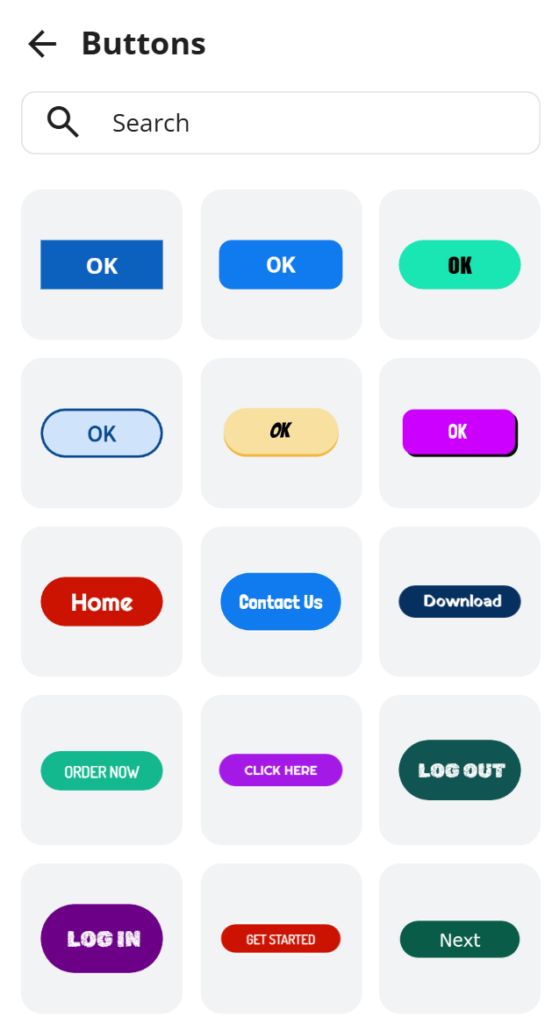
3. Built-in Assets (Frequency Updated)
This new feature provides a comprehensive library of customizable assets, including buttons, navigation elements, icons, and more, to enhance your educational content.
With these built-in assets, creating interactive and visually appealing eLearning materials has never been easier. Users can effortlessly drag and drop these elements into their presentations or quizzes, ensuring a consistent and professional look throughout.
Whether you need engaging buttons for navigation or illustrative icons to highlight key points, our library has you covered.
You can find the library by navigating to the Elements tab in the left sidebar.
Additionally, these assets are fully customizable, enabling you to adjust colors, sizes, and styles to fit your branding.

Last Words
Have you experienced all these updates and improvements in uPresenter? Log in to your account now and give each of them a first try. We are eager to receive more feedback on how we can improve our product.
Don’t hesitate to contact us at support@ulearnbox.com. And, check out our Change log frequently to keep yourself updated, follow us on our YouTube channel, Facebook, and Community, and read more content on our Blog site. We can’t wait to connect with you more 💜
Accessing Presentations Anywhere: The Benefits of Cloud-Based Storage
Cloud-based storage has revolutionized the way we manage and share data, including presentations. With uPresenter, you can harness the power of the cloud to create, store, access, and edit your presentations from anywhere. Let’s explore how cloud presentation tool enhances your presentation experience and why uPresenter is the perfect platform to make the most of it.

1. Work from Anywhere, Anytime
Gone are the days of being tied to a specific device or location. With uPresenter’s cloud-based storage, your presentations are just a few clicks away – whether you’re at the office, at home, or on the go. Need to make last-minute edits before a meeting? Simply log in, and you’re ready to go.

2. Seamless Collaboration
Collaboration is key in modern workplaces, and uPresenter makes it effortless. Share your presentation with team members, get real-time feedback, and co-edit without the hassle of emailing large files. The cloud ensures everyone works on the most up-to-date version, improving productivity and teamwork.
3. Automatic Backups
Ever experienced the heart-stopping moment of losing an important file? With uPresenter, you don’t have to worry. Your presentations are automatically saved to the cloud. This will protect your work from accidental deletions or device malfunctions.
4. Multiple Sharing Options
Need to share a presentation with a client or colleague? uPresenter lets you generate shareable links for instant access. Just turn the Publish button on to make the link available to share.
Not only can you share a link for online access, but you can also share downloadable files, such as PDFs and xAPI packages, for offline use. Whether it’s a live presentation or a downloadable file, the cloud ensures smooth and hassle-free sharing.
5. Designed for Multiple Devices
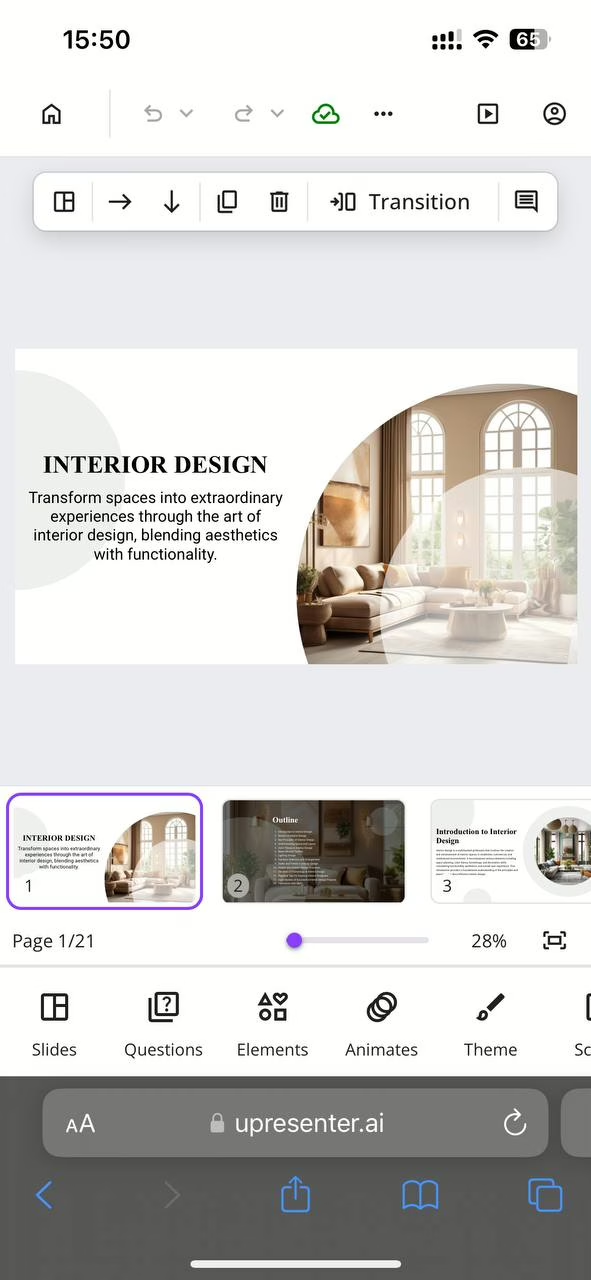
Whether you’re working on a desktop, laptop, tablet, or smartphone, uPresenter adapts to your device. Your presentations are stored in the cloud, enabling seamless transitions between devices without compatibility issues. Here is a uPresenter project on a smartphone.
6. Enhanced Security
uPresenter’s cloud storage comes with robust security features to keep your data safe. Your files are encrypted and stored in secure servers, ensuring that only you and authorized collaborators have access.
How uPresenter Stands Out Among Cloud Presentation Tools
Unlike traditional presentation tools, uPresenter combines AI-powered features with cloud technology to deliver a superior user experience. From creating stunning slides to integrating quizzes and interactive content, uPresenter optimizes every aspect of presentation creation.
With uPresenter, you don’t just create presentations, but you revolutionize how you manage, share, and access them. The cloud-based approach ensures your presentations are always at your fingertips, enabling you to focus on what truly matters: delivering impactful content.
Start Accessing Your Presentations Anywhere Today
Ready to take your presentations to the next level? Try uPresenter and experience the benefits of cloud presentation tools firsthand. Whether you’re an educator, a business professional, or a student, uPresenter empowers you to create, share, and deliver presentations with ease and confidence.
Don’t let location or device limitations hold you back – let uPresenter be your partner in delivering outstanding presentations anytime, anywhere.
See Also:
AI Tools for Presentations: Multiple Ways to Visualize Content in uPresenter
Engage Audience with Storytelling: uPresenter’s AI Storytelling Tool